K
@K4y1sStoring Data on Arweave
Created by:
About this lesson
Greetings! I welcome you to lesson three of the Arweave 101 track. After the previous lesson taught you how to access data on Arweave, this one will explain how to store your data there.
Arweave is a blockchain network for permanent storage. You pay for your storage at upload time, and the network will incentivize constant replication. (You can read lesson zero to learn more about how this works.)
The second step of interacting with Arweave is to upload your files to the network. You can build decentralized permanent web apps by reading and writing data on Arweave. The lesson starts without a wallet, as some upload services subsidize file uploads under 100KiB. However, during this lesson, you must install an Arweave crypto wallet.
Prerequisites
You need a basic understanding of web technologies like HTTPS, HTML, JavaScript, and Node.js.
A basic understanding of blockchains is helpful, too. At least you should understand what wallets and transactions are.
A browser and Node.js are required to try the examples.
Since using web crypto functions requires HTTPS, you might want to use a cloud IDE like GitHub Codespaces or a service like lcl.host.
How to Store Small Files on Arweave?
Thanks to layer 2 (L2) bundling services that store multiple transactions and files in a single layer 1 (L1) transaction, uploading data under 100KiB is so cheap that the major bundling services subsidize them. You can upload small files without paying tokens.
Uploading via Front-end
Let’s start by creating a web application that uploads small files.
First, you run the following commands to install Vite and Arweave dependencies:
npm create vite@latest demo-frontend -- --template vanilla
cd demo-frontend
npm i && npm i arweave @ardrive/turbo-sdk
Next, you implement the front-end. The arweave package will generate a random wallet address for each upload. Remember, you upload each file alongside a transaction, so it needs to be signed by a private key of an Arweave wallet.
The @ardrive/turbo-sdk package will handle all the upload modalities for us:
- Converting the file to a data item
- Creating a transaction and linking it to the data item
- Signing the transaction with the private key of our randomly generated wallet
- Submitting the transaction to a bundling service that will then seed it to Arweave
Replace the content of demo-frontend/index.html with the following code:
<!doctype html> <title>Arweave File Upload</title> <form id="uploadForm"> <input name="fileInput" type="file" /> <button type="submit">Upload</button> </form> <ul id="fileList"></ul> <script type="module"> import arweave from "arweave"; import { TurboFactory } from "@ardrive/turbo-sdk/web"; document .getElementById("uploadForm") .addEventListener("submit", async (event) => { event.preventDefault(); const file = event.currentTarget.elements.fileInput.files[0]; if (file.size / 1024 > 100) return alert("File is bigger than 100KiB!"); const turbo = TurboFactory.authenticated({ privateKey: await arweave.crypto.generateJWK(), }); const uploadResult = await turbo.uploadFile({ fileStreamFactory: () => file.stream(), fileSizeFactory: () => file.size, }); const fileUrl = `https://arweave.developerdao.com/${uploadResult.id}`; const liElement = document.createElement("li"); liElement.innerHTML = ``; document.getElementById("fileList").appendChild(liElement); }); </script>
You can test the app with this command:
npm run dev
💡
Note: For the next step, remember that files on Arweave are permanently stored, so don’t upload sensitive information!
Open the URL of the development server in your browser, choose a file smaller than 100KiB, and click the “Upload” button. After a few seconds, you should see a new link that allows you to download and share your file. Figure 1 shows an example upload.

Figure 1: Example upload
AWESOME! You just stored your first file permanently on Arweave!
Keep going, and fill the remaining knowledge gaps to build fully-fledged DApps!
Uploading via Back-end
Next, we build a simple CLI uploader with Node.js.
Run the following commands to initialize a new Node.js project and install the same dependencies:
mkdir demo-backend && cd demo-backend
npm init -y && npm i arweave @ardrive/turbo-sdk
Then, create a new file at demo-backend/index.mjs with the following code:
import fs from "fs";
import Arweave from "arweave";
import { TurboFactory } from "@ardrive/turbo-sdk";

const filePath = new URL(process.argv[2], import.meta.url).pathname;
const fileSize = fs.statSync(filePath).size;

if (fileSize / 1024 > 100) {
  console.error("File bigger than 100KiB!");
  process.exit(1);
}

const arweave = new Arweave({});
const turbo = TurboFactory.authenticated({
  privateKey: await arweave.wallets.generate(),
});

const uploadResult = await turbo.uploadFile({
  fileStreamFactory: () => fs.createReadStream(filePath),
  fileSizeFactory: () => fileSize,
});

console.log(`https://arweave.developerdao.com/${uploadResult.id}`);
Again, the arweave and @ardrive/turbo-sdk packages handle the wallet creation and upload.
The CLI requires a file path as the first argument so you can upload the package.json file to test it.
node ./index.mjs ./package.json
The output should be a gateway URL to the file on Arweave.
Review: Bundled Transactions
Arweave supports two types of transactions: L1 and L2 (or “bundled”). L1 transactions become part of Arweave blocks, while Arweave stores bundled transactions in the body of an L1 transaction outside blocks.
Despite not being part of blocks, Arweave’s consensus algorithm relies on the bodies of L1 transactions, so miner nodes are incentivized to store L1 bodies and, in turn, bundled transactions as possible.
Bundled transactions have higher TPS than L1 transactions, and the bundling services let you pay with tokens other than AR. The subsidized 100KiB transactions are nice, too.
How to Store Big Files on Arweave?
The free uploads are awesome but limited. You can’t upload audio, video, or a common web app with just 100KiB of storage per file. Let’s look at bigger uploads.
Again, you will use the Turbo SDK, which lets you pay with fiat. Since you pay up-front with fiat, you can’t use random wallet addresses anymore, as the Turbo SDK will associate your payments with an address. You need a reusable wallet address, which you can create with ArConnect, Arweave’s most popular crypto wallet. It’s a browser extension that comes with a handy install video.
Go to the ArConnect download page and follow the instructions to install the wallet and create your first address.
💡
Note: You should only use this address for development purposes.
Upload via Front-end
Let’s start with a web app again. Create a new Vite project and install the dependencies with the following commands:
npm create vite@latest demo-frontend-big -- --template vanilla
cd demo-frontend-big
npm i && npm i @ardrive/turbo-sdk vite-plugin-node-polyfills
As the Turbo SDK uses the Buffer class in the background, you need the Node.js polyfill. To set it up, create a demo-frontend-big/vite.config.js file with this code:
import { defineConfig } from "vite";
import { nodePolyfills } from "vite-plugin-node-polyfills";

export default defineConfig({
  plugins: [nodePolyfills()],
});
💡
Note: A polyfill is a library that adds missing language or runtime features to your environment. For example Buffer is only natively available on Node.js.
Next, you implement the front-end. Again, first the explanation, then the code. While this is under 100 lines of code, it’s still a bit much at once, so let’s look at the rendered HTML in Figure 2 to understand how this will look in the browser and then go through the code step by step.
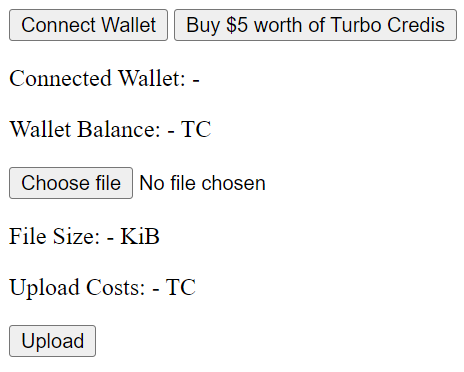
Figure 2: Upload application
The first half of the code, the HTML at the top, renders the DOM elements, as seen in Figure 2.
The JavaScript code links up event handlers for the buttons.
The “Connect Wallet” button asks ArConnect for wallet permissions required by the Turbo SDK. It will also read your address's turbo credit balance. This requires you to sign a request to the Turbo API.
The “Buy” button calls the Turbo SDK to start a Stripe checkout session and opens it in a new tab. Here, you can buy Turbo Credits (the token required for uploads with the Turbo SDK). This will work either with Google Pay or a credit card.
💸
If you want to try a larger upload for yourself, get 20% off of one Turbo Credits purchase with promo code: DDDISCOUNT
The “Choose file” input lets you choose a file from your disk and will calculate the size and costs of uploading that file to Arweave. Everything under 100 KiB is still free.
Lastly, the “Upload” button uses the Turbo SDK to upload the file to Arweave. The turbo credits will automatically be debited from your wallet address.
After you connect your wallet, buy turbo credits, select a file, and upload it, the app will show you a link to a gateway for download. For the example of 322KiB in Figure 3, the USD equivalent would be around $0.0145.
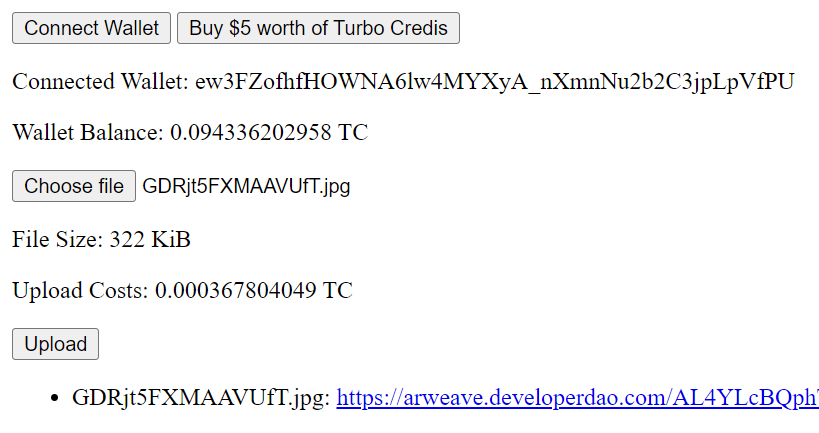
Figure 3: Application after upload
Now to the actual code. Replace the content of the demo-frontend-big/index.html file with the following:
<!doctype html> <title>Arweave File Upload</title> <button id="connectButton">Connect Wallet</button> <button id="chargeButton">Buy $5 worth of Turbo Credits</button> <p>Connected Wallet: <span id="walletAddress">-</span></p> <p>Wallet Balance: <span id="walletBalance">-</span> TC</p> <form id="uploadForm"> <input name="fileInput" type="file" id="fileInput" /> <p>File Size: <span id="fileSize">-</span> KiB</p> <p>Upload Costs: <span id="uploadCosts">-</span> TC</p> <button type="submit" id="uploadButton">Upload</button> </form> <ul id="fileList"></ul> <script type="module"> import { ArconnectSigner } from "arbundles/web"; import { TurboFactory, USD } from "@ardrive/turbo-sdk/web"; let turbo; document .getElementById("connectButton") .addEventListener("click", async () => { await window.arweaveWallet.connect([ "ACCESS_ADDRESS", "ACCESS_PUBLIC_KEY", "SIGNATURE", "SIGN_TRANSACTION", ]); turbo = TurboFactory.authenticated({ signer: new ArconnectSigner(window.arweaveWallet), }); const activeAddress = await window.arweaveWallet.getActiveAddress(); document.getElementById("walletAddress").innerText = activeAddress; const balance = await turbo.getBalance(); document.getElementById("walletBalance").innerText = balance.winc / 1_000_000_000_000; }); document .getElementById("chargeButton") .addEventListener("click", async () => { const result = await turbo.createCheckoutSession({ amount: USD(5.0), owner: activeAddress, promoCodes: ["DDDISCOUNT"], // 20% discount }); const checkoutButton = document.getElementById("checkoutButton"); chargeButton.onclick = () => window.open(result.url, "_blank").focus(); }); document .getElementById("fileInput") .addEventListener("change", async (event) => { const fileSizeInKib = Math.ceil(event.currentTarget.files[0].size / 1024); document.getElementById("fileSize").innerText = fileSizeInKib; const [costs] = await turbo.getUploadCosts({ bytes: [event.currentTarget.files[0].size], }); if (fileSizeInKib > 100) document.getElementById("uploadCosts").innerText = costs.winc / 1_000_000_000_000; }); document .getElementById("uploadForm") .addEventListener("submit", async (event) => { event.preventDefault(); const file = event.currentTarget.elements.fileInput.files[0]; const uploadResult = await turbo.uploadFile({ fileStreamFactory: () => file.stream(), fileSizeFactory: () => file.size, }); const fileUrl = `https://arweave.developerdao.com/${uploadResult.id}`; const liElement = document.createElement("li"); liElement.innerHTML = ``; document.getElementById("fileList").appendChild(liElement); }); </script>
Upload via Back-end
First, create a new Node.js project and install the dependencies.
mkdir demo-backend-big && cd demo-backend-big
npm init -y && npm i @ardrive/turbo-sdk
Next, you must export a key file from ArConnect — Figure 4 shows where you can find the settings.
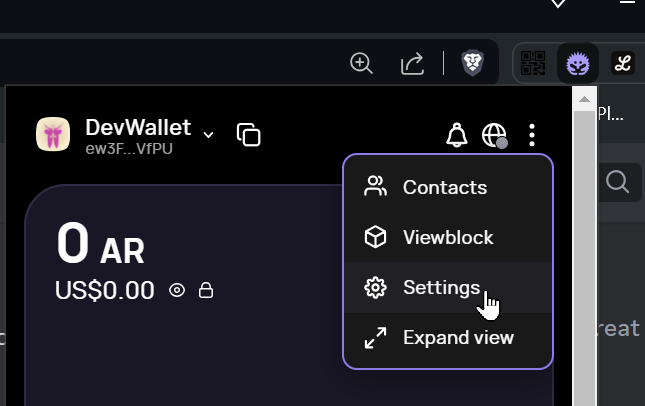
Figure 4: ArConnect settings
In the settings, navigate to Wallets, select your development wallet, and click the “Export Keyfile” button on the bottom right. Save the file in demo-backend-big/key.json.
Then, create a new file at demo-backend-big/index.mjs and add the following code:
import fs from "fs";
import readline from "readline/promises";
import { ArweaveSigner, TurboFactory } from "@ardrive/turbo-sdk";

const signer = new ArweaveSigner(
  JSON.parse(fs.readFileSync("./key.json", { encoding: "utf-8" })),
);
const turbo = TurboFactory.authenticated({ signer });

const filePath = new URL(process.argv[2], import.meta.url).pathname;
const fileSize = fs.statSync(filePath).size;

console.log(`File Path: ${filePath}`);
console.log(`File Size: ${fileSize / 1024} KiB`);

if (fileSize / 1024 > 100) {
  const [costs] = await turbo.getUploadCosts({ bytes: [fileSize] });
  console.log(`Upload Costs: ${costs.winc / 1_000_000_000_000} TC`);
}

const answer = await readline
  .createInterface(process.stdin, process.stdout)
  .question("Do you want to start the upload? (y/n) ");

if (answer != "y") process.exit(0);

const uploadResult = await turbo.uploadFile({
  fileStreamFactory: () => fs.createReadStream(filePath),
  fileSizeFactory: () => fileSize,
});

console.log(`https://arweave.developerdao.com/${uploadResult.id}`);
Compared to the small file example, you can eliminate the arweave dependency, as the Turbo SDK can load key files directly. Besides that, the CLI version reads similar information from Arweave to calculate costs and balances.
You don't have to buy credits again if you already bought turbo credits in the front-end version and reused the wallet address.
The CLI requires a file path as the first argument so you can upload the package.json file to test it.
node ./index.mjs ./package.json
The output should look similar to this for files smaller than 100KiB:
File Path: /home/user/demo-backend-big/package.json
File Size: 0.3046875 KiB
Do you want to start the upload? (y/n) y
https://arweave.developerdao.com/YG3PpZHN...
For bigger files, it will include the costs:
File Path: /home/user/demo-backend-big/package.json
File Size: 450.34375 KiB
Upload Costs: 0.000367804049 TC
Do you want to start the upload? (y/n) y
https://arweave.developerdao.com/YG3PpZHN…
What are Popular Arweave Bundling Services and SDKs?
You can only upload files with L1 transactions by paying AR tokens. Bundling services help overcome this limitation by providing alternative payment methods. While not part of this lesson, it’s notable that you can use non-Arweave wallets to sign bundled transactions for Arweave.
Popular bundling services are Irys and ArDrive.
Irys is a service that helps upload to Arweave with its Irys SDK and search for uploads with the Irys Query Package. It supports payment with tokens like ETH, SOL, USDC, etc. You can find an up-to-date list of supported tokens in the Irys docs.
Permanent Data Solutions, the creators of ArDrive, a permanent storage alternative to services like DropBox, also provide bundling services. In this lesson, we used the Turbo SDK, which enables payments in AR, ETH, SOL, and even fiat. There is also the ArDrive Core library, which comes with built-in ArFS support, so if you want to use your uploaded files directly in your ArDrive, that’s the way to go.
The Turbo and the Irys SDK are based on ArBundles, which allows you to create and upload bundles directly to Arweave. However, this is out of scope for this lesson.
For quickly building apps on top of these tools, Community Labs offers a comprehensive front-end library called Arweave Kit. It integrates well with popular frameworks and comes with authentication, encryption, and GraphQL clients.
What are Popular Arweave Wallets?
Arweave supports three wallet types: libraries, extensions, and hardware wallets. Arweave.app and arweave-js are library wallets. You import them into your app, and they handle signing. That way, your users don’t have to install a wallet extension. Arweave.app is for front-end apps, and arweave-js is for backend apps. However, Arweave.app is often a bit harder to integrate with other libraries like the Turbo SDK; that’s why it isn’t used in this course.
ArConnect is the go-to wallet for everyday tasks. It’s always up-to-date and integrates well with SDKs. The downside is that it requires installation, as it’s a browser extension.
You can also check out Ledger if you’re searching for cold storage for your AR.
Summary
In this lesson, you learned all about uploading data to Arweave. The bundling services and their SDKs enable you to get all your files on Arweave without buying AR tokens, and you don't need to pay anything for small files under 100KiB.
You also created your first wallet address and learned about the available Arweave wallets. With wallet libraries and extensions, you can build DApps that work directly in the browser or use Node.js.
Connect your wallet and Sign in to start the quiz
Conclusion
Uploading files to Arweave isn’t much different from sending Bitcoin or Ethereum transactions. With the skills you have acquired until now, you can upload and access your media and documents on Arweave.
If you upload HTML documents with JavaScript, you can create a DApp already!
Congratulations!
You finished the second practical lesson of the Arweave 101 track!
Now, you can upload your own data to Arweave’s permanent storage from your browser or any other HTTP client.
In the next lesson, you will learn to combine the basics you learned to host your first static website with a custom name on Arweave!