7i7o, piablo
@7i7o@SkruffsterCrafting a Basic NFT: A Step-by-Step ERC721 Tutorial for Beginners
Created by:
About this lesson
Welcome to this lesson on creating a series of NFTs using Solidity smart contracts with a range of developer tools. If you are new to programming, we recommend you first complete our Getting Started with Smart Contract Development project, where you can learn the basics of Solidity and some of the concepts we use in this lesson. We also have a series of follow-up projects to this one, the next one being TierNFTs, but let's not get ahead of ourselves just yet.
We have some checkpoint questions for you throughout the lesson for testing previous knowledge, predicting next steps in the lesson, or letting you see for yourself how well you're absorbing the new content. There's a quiz at the end, so make sure you're checking out all the side-drawers for a deeper dive of the new concepts. To complete the lesson, expect somewhere between one and six hours, depending on your previous experience and the need to learn new ideas. Let's also make the learning enjoyable by taking care of our well-being. Take regular breaks, and please do go outside and "touch grass." 😊 Nature is the source of much of our well-being. 🌱
What are we buidling?
In this project we will build a basic NFT smart contract that will serve as the backbone or foundation for almost any future NFT project.
But let's pause quickly to see what you already know and give you a flavour of what's to come:
How did you find that? No worries if the answers didn't come easily. We're here to fill in the gaps!
Why? Because NFTs are not just jpegs, they carry many superpowers that could improve our lives in many ways.
What is an NFT? NFT stands for Non-Fungible Token. In plain English, an NFT is a crypto token that is verifiably unique.
So, what can we do with them? Since they live on the blockchain and are unique, we can use them to verify ownership of a real world asset (real estate deeds, art), to represent a membership (club membership, fan club), to track real world items in a supply chain (medicine, food, clothing), to use as tickets (movies, events, concerts, VIPs) and many more use cases we have yet to discover.
Their uniqueness includes the ability to convey properties inside them. The value inherent to blockchains and the fact ownership can be transferred, leads to people attaching value to them. This has created huge opportunities for individuals, marketplaces and platforms to trade, transfer or issue these assets.
Now that we know they can be much more than just an image, what are we waiting for?
Lesson breakdown
By the end of this lesson we'll have learned a lot. A breakdown of the steps to get there is:
- set up our development environment
- install dependencies
- create a project template
- create a smart contract using a code editor
- include images and files for our NFTs
- optional: create your own images and files, and store them in a decentralized way
- deploy our smart contract to a testnet blockchain
- mint, i.e. create our very own NFT
- see our NFT in a public marketplace
Dev tools
To achieve this, we'll need diverse developer tools. We'll also need to open a couple of accounts as we progress from one development environment to the next. We'll be using:
- a console
- an IDE
- optional: a Pinata account for web3 storage of content
- a Web3 wallet for testing
- some test ETH
- an API key from an RPC provider
- optional: an account for that provider
Lots of fun to come! And no worries, we'll give you all those steps in due course.
Set up your environment
Just like the pros! For that we are going to set up our working environment on our computer, making sure we have all the necessary tools to create, debug and deploy smart contracts.

To begin our project, we should open a command line interface, a.k.a. a console. Check your operating system options below on how to use one. We will also be using npm, the package manager from Node, and its command npxthat allows us to run or execute a package or one of its scripts. If you are comfortable with another package manager, feel free to use it.
Let’s create and navigate into a D_D Academy projects folder, then create a folder for our NFT project and cd into that too:
# create a folder for all our D_D Academy projects
mkdir d_d_academy
cd d_d_academy

# create a folder for this project
mkdir projectNFT
cd projectNFT

# initialize our folder as an npm package
npm init -y

# install hardhat (and its dependencies)
npm install --save-dev hardhat
💡
The --save-dev flag used in the last command, lets the project know it's a development dependency, i.e. not needed in production. You can view what dependencies are needed in the package.json file in the root of the project.
Create your project
Once we have our environment set up, we need to set up a project.

We run the npx hardhat init command to generate a basic project:
// 888    888                      888 888               888
// 888    888                      888 888               888
// 888    888                      888 888               888
// 8888888888  8888b.  888d888 .d88888 88888b.   8888b.  888888
// 888    888     "88b 888P"  d88" 888 888 "88b     "88b 888
// 888    888 .d888888 888    888  888 888  888 .d888888 888
// 888    888 888  888 888    Y88b 888 888  888 888  888 Y88b.
// 888    888 "Y888888 888     "Y88888 888  888 "Y888888  "Y888

👷 Welcome to Hardhat v2.14.0 👷

? What do you want to do? …
❯ Create a JavaScript project
  Create a TypeScript project
  Create an empty hardhat.config.js
  Quit
We choose Create a Javascript project and Hardhat will create an example project for us. It will give us 3 prompts for options. Choosing the defaults is ok for us. Here's what mine asked me:
✔ What do you want to do? · Create a JavaScript project
✔ Hardhat project root: · ~/d_d_academy/projectNFT
✔ Do you want to add a .gitignore? (Y/n) · y
✔ Do you want to install this sample project's dependencies with npm (@nomicfoundation/hardhat-toolbox)? (Y/n) · y
- Hardhat project root → Hit Enter - this is the folder where we want to create the project.
- Do you want to add a .gitignore? → Select 'y'. If you are patient to finish the lesson, you'll learn what it's for.
- Do you want to install this sample project's dependencies with npm (…)? → Select 'y'. These are packages (programs) that our project needs to be able to run.
💡
The project asked us to install @nomicfoundation/hardhat-toolbox in the last prompt. If they didn’t install or we accidentally chose ‘n’, we can always install them manually with:
npm install --save-dev hardhat @nomicfoundation/hardhat-toolbox
- After these selections, you can expect to see some messages regarding vulnerabilities, npm warnings for deprecated files and prompts to audit. No need to worry or take action, this is to be expected in development, and we all got a shock the first time too! However, if you get messages that say 'ERROR', then jump into the forum and ask for guidance.
In a Hardhat project, the default folders are:
- contracts/ where the source files for your contracts should be.
- scripts/ where simple automation scripts go.
- test/ where your tests should go.
We need to delete some files inside those folders so we can start our own project afresh:
rm contracts/*.sol
rm scripts/*.js
rm test/*.js
We now need to add our last dependency - OpenZeppelin contracts:
npm install @openzeppelin/contracts
💡
Open Zeppelin developed a lot of standard contracts that are super powerful, widely used and fully tested and audited.
Let’s start coding!
With our project folder ready, we can now fire up our Code Editor.
💡
We are using VS Code for this project, we think it has a good balance of costs vs. benefits. But you can use whatever you feel comfortable with. A few of the more popular code editors are Atom, Sublime, Vim, Emacs, and many more.
Enough rambling, let’s start writing our contract!
In your console, type code . and yes, with that dot at the end! Wait for the magic.
Let’s create an empty file named ProjectNFT.sol inside the contracts/ folder and copy this code inside:
// SPDX-License-Identifier: MIT
pragma solidity 0.8.20;

contract ProjectNFT {
}
If you’ve been through our first project, you’ll remember the first lines defines our copyright license, the second one defines the Solidity version we are going to be using for this contract and the last two lines are how we declare a smart contract in Solidity.
With an empty project, we can now start adding what we need to create our awesome NFT collection. ERC721, the formal specification to follow for NFTs, has a lot of requirements to meet. For example NFTs should have a numbered ID, functions to transfer them, and the ability to approve others as delegates to transfer them, etc.
All of it is pretty much for our project, but luckily OpenZeppelin has developed a lot of contracts that implement these standards and more. They are widely used and audited, and the thing we love about them, they are open-source and we can use them to leverage our learning process. With that in our heads, we are going to use them inside our contract.
Standing on the shoulder of giants
For this we are going to ‘inherit’ (think of using the properties of or extending for now) the ERC721 contract from OpenZeppelin, or the same way you inherit the DNA and characteristics from your relatives.
This is what we need in our code:
// SPDX-License-Identifier: MIT
pragma solidity 0.8.20;

import "@openzeppelin/contracts/token/ERC721/ERC721.sol";

contract ProjectNFT is ERC721 {

    constructor(string memory _name, string memory _symbol)
        ERC721(_name, _symbol) {}

}
- After our pragma statement, we add an import statement, that lets us use the contracts in the ERC721.sol file.
- Next, we add is ERC721 to our contract ProjectNFT statement. This lets us inherit all the variables, functions, events, etc from ERC721 into the new ProjectNFT contract, where we can use them, as if they were its own, as well as any new code we write.
- Every contract has a constructor function. This is called only once when the contract is first deployed. The ERC721 constructor which we will inherit has two parameters, so we need to assign them arguments i.e. an actual name and symbol for our NFT. Therefore, we will create a new constructor, while still inheriting the ERC721’s. Our constructor will receive 2 parameters and call the ERC721 constructor with them. Composability, eh?
Whose is whose?
We need to identify our NFTs, this is what gives each one its uniqueness on the blockchain.

We are going to use a state variable to keep track of the total supply of NFTs, which we can use as our ID for each new token created:
// SPDX-License-Identifier: MIT
pragma solidity 0.8.20;

import "@openzeppelin/contracts/token/ERC721/ERC721.sol";

contract ProjectNFT is ERC721 {

    uint256 private totalSupply;

    constructor(string memory _name, string memory _symbol)
        ERC721(_name, _symbol) {}

}
We made our totalSupply variable private and it will store the exact number of NFTs that have been minted. In the next step we will use this variable to identify each new NFT that’s created.
Go touch grass 😊 🌱
Mint… Feels Good
Once we have a way to identify our NFTs, we only need a way to create them.

We will add a function to mint new items, and yes, that means creating a new NFT:
// SPDX-License-Identifier: MIT
pragma solidity 0.8.20;

import "@openzeppelin/contracts/token/ERC721/ERC721.sol";

contract ProjectNFT is ERC721 {

    uint256 private totalSupply;

    constructor(string memory _name, string memory _symbol)
        ERC721(_name, _symbol) {}

    function mint() public {
        totalSupply++;
        _safeMint(msg.sender, totalSupply);
    }

}
What our mint function does first is increment our totalSupply state variable by 1, because our collection will have one item more. Then it calls a function from our inherited ERC721 contract called _safeMint that allows a new item to be added to our ProjectNFT contract.
As you can see, OpenZeppelin implementation takes care of all the heavy lifting, but later in our learning journey we will be able to understand how it all works under the hood.
Ok but, what does it do?
We can create unique NFTs by now, but we haven't added any media or utility to them just yet.
We are missing the last piece of the puzzle. For now they are just a numbered proof of ownership from our contract stored on the blockchain. So here is where the magic starts. We can make our NFT collection about anything we want: text, images, music, videos, anything you want. But how?
The ERC721 implementation we inherited has a function to store a tokenURI. But what is this strange magic? This is just a unique URI (Uniform Resource Identifier), a web address if you prefer, that points to something on the internet, whatever we want it to be. e.g. a video, an image.
OpenZeppelin ERC721 contract provides us a way to create unique URIs from the IDs of the NFTs. It gives a way to define a 'base path' for a web address and just attaches the token ID at the end of it. So, if you wanted, you could upload your NFT info (we'll look at how we store that later) to any web address, say www.my-site.com/my-nft-collection and number each file with the corresponding ID (1, 2, 3, 4…).
We are not going to limit the size of our collection for this project.
So, to let our inherited contract know where our NFTs will be stored, we have to override an OpenZeppelin function. Actually, you are expected to do this if you look into OpenZeppelin's documentation. There’s a good reason for everything. Well, lots of things. And this is one of them!
Here's the modifications we will add and I'll explain them below:
// SPDX-License-Identifier: MIT
pragma solidity 0.8.20;

import "@openzeppelin/contracts/token/ERC721/ERC721.sol";

contract ProjectNFT is ERC721 {

  uint256 private totalSupply;
  string private ipfsBaseURI;

  constructor(string memory _name, string memory _symbol, string memory baseURI)
    ERC721(_name, _symbol) {
      ipfsBaseURI = baseURI;
    }

  function mint() public {
    totalSupply++;
    _safeMint(msg.sender, totalSupply);
  }

  function _baseURI() internal view override returns (string memory) {
    return ipfsBaseURI;
  }

}
What have we done?
- We added a state variable where we will store the base of the URI for the NFTs
- We added a 3rd parameter to our constructor, so we can store our base URI when we deploy the contract to the blockchain
- Inside the constructor, we assign this new parameter to our new state variable
- Finally, we create a function that has the override modifier to indicate that this function replaces the one that is inside our inherited contract.
Internally, when someone needs to consult an NFT's info, they call the OpenZeppelin's tokenURI function. That function only joins the return value of our new _baseURI function with the ID of the token requested.
With that we can see the power of inheritance and overriding. We can inherit a whole set of functionalities and change only what we need to create a different experience.

Media for our NFTs
We have most of our smart contract ready, so we are going to focus on the media that we want on our NFTs.
We propose a choose your own adventure for this part of the project:
- If you want to go quickly into deploying the contract, you can use the images and files that we prepared, and move on to the next section.
- If you want to create your own images and have an NFT of your own, why not take the winding road and learn a little about the standard used to identify NFTs and a solution to store files in a decentralized way.
Go touch grass 😊 🌱
Deploy! Back to Solidity... kind of...
You might remember this from the previous project, when we used Remix. Once we have our contract ready, we can compile and deploy. In Remix, we had a bunch of buttons in the web interface, but now we are going pro, a.k.a. doing it all ourselves in the console.
Why are we deviating from Solidity? Because of the way we set our contract up. When we deploy, we tell our contract where our files are stored. Therefore we have to store the files somewhere to get the address we need to run the deployment.
So, now that we have our media and JSONs uploaded, we can deploy our NFT contract!
Remember the scripts folder at the beginning of our project? That's where we are going to create our script to tell Hardhat the set of instructions to follow. We can create one for deploy, another one to mint or call functions of our contract. Hardhat uses Javascript for this.
So, let's create a deploy.js under the scripts/ folder and copy this in:
// import Hardhat to use it inside our script
const hre = require("hardhat");

// We define a variable with the name of our contract
const CONTRACT_NAME = "ProjectNFT";

// The 3 parameters for our smart contract's constructor (CHANGE THESE to your own NFT name and description)
const NFT_NAME = "D_D Academy";
const NFT_DESCRIPTION = "D_D Academy Basic NFT Collection";

// CHANGE THIS if you created your own images/JSONs:
const NFT_BASE_URI =
  "https://gateway.pinata.cloud/ipfs/QmSCNdaA5JBT5D6V5FbivfZonKjdsMPeZeTyTWzq1D3yrJ/";

// We define a function with all we want Hardhat to run
async function main() {
  // We get the contract factory from Hardhat
  const ContractFactory = await hre.ethers.getContractFactory(CONTRACT_NAME);

  // We deploy the contract (notice we pass 3 parameters that our contract's constructor needs)
  const contract = await ContractFactory.deploy(
    NFT_NAME,
    NFT_DESCRIPTION,
    NFT_BASE_URI,
  );

  // We wait for it to be deployed to the blockchain
  await contract.waitForDeployment();

  // We print the contract's address to the console
  console.log(`${CONTRACT_NAME} deployed to: `, await contract.getAddress());

  // --> ( We'll add more stuff here later ) <--
}

// We call the main function we created above (don't change this)
main()
  .then(() => process.exit(0))
  .catch((error) => {
    console.error(error);
    process.exit(1);
  });
The code has comments outlining what each section does, but it basically has 1 variable for our contract's name so the script knows which contract to deploy, and 3 more variables for the data our constructor needs: a Name, a Description and a Base URI for our files. With that info set at the top, the script deploys the contract, waits for it to be deployed and then prints the address of our deployed contract to the console.
Before we run our script, we need to tell Hardhat what Solidity version our contracts are using. For that, we need to go into the hardhat.config.js file in our project's root folder. Find the line that says solidity: '0.8.xx', and replace the 0.8.xx for the pragma used in our contract: 0.8.20.
We could have used a range of Solidity versions e.g. ^0.8.0 in our contract, but we like to promote best practices by choosing a fixed Solidity version and knowing beforehand nothing is going to change in our bytecode if a new version in that range is released.
Now, to run the script we type this in the console:
npx hardhat run scripts/deploy.js
This is the output i got:

Notice that it ‘Compiled 10 Solidity files successfully’, but we only wrote 1 Solidity file! Well, we are actually inheriting some of OpenZeppelin's implementations, so the compiler also has to process everything we are importing in our contract.
Since we are in a development environment, Hardhat provides us with the tools to run this in a local blockchain, without the hassle of dealing with blockchain times, tokens to pay gas for our deployment, etc. This means our contract was deployed to a dummy blockchain Hardhat created, it all went well, and then the blockchain gets deleted.
Taking advantage of this, we are going to add a mint after the deploy to test if all goes well.
Let's add these lines after the console.log part, right where we left a placeholder before in our deploy.js file:
// --> ( We'll add more stuff here later ) <--

// We call the contract to mint 1 NFT
const tx = await contract.mint();

// We wait for the transaction to finish
await tx.wait();

// We ask for the tokenURI of the recently minted NFT
// (we assume 1 is the tokenId  since we only minted one)
const tokenURI = await contract.tokenURI(1);

// We print out the tokenURI
console.log(`NFT 1 tokenURI: ${tokenURI}`);
Let's run the script again and see what it tells us! Here's my output:

We got the URI of the token, right? So, now we know we can deploy it, and mint to a real blockchain!
Go touch grass 😊 🌱
Things just got real!
For us to get our contract out of our computers and into the real world, we are going to run the deploy again, but this time to a testnet.
What is a testnet? It is a basically a whole running blockchain, but it runs only so people can try stuff out. On it, you have ETH, NFTs, or other tokens but they have no monetary value. This way, you can develop and test your contracts without fear of losing anything valuable. Ethereum has many testnets, and you might notice that many used Goerli testnet in the past. But we suggest that you use Sepolia testnet, now that it has compatible NFT hosting support, and longevity for app development that Goerli won't outlast.
Before we go any further, let's take an extra step for precaution. In the next project we'll learn how to use collaborative tools to store our projects, but for now, let's open our root directory's .gitignore file and add this line:
hardhat.config.js
In order to deploy to a real testnet we'll need:
- An Ethereum wallet that can connect to Sepolia. Zerion is a good example
- Some Sepolia-ETH. You can ask for some in a faucet, it's free, although some are faster than others! Options: #1, #2, #3
- An API Key from an Ethereum RPC Node Provider, e.g.
Grove, Nodies
- If you're a Developer_DAO member, check out D_D Grove Perks
- A minor change in the Hardhat configuration file
First and foremost, security. We are exploring new grounds, experimenting, and by doing so, we could make mistakes that we wouldn't want to happen where we have any assets of value.
We strongly recommend you use a separate wallet for developing, completely independent from the one that holds any personal assets you might have on the blockchain. For example, you could create a new profile for yourself in your favourite browser, and create your developer wallet in there.
Wallets have a special number, called a private key. You should never, ever share your private keys with anyone. If anyone has that number, they can take full control of the wallet, and empty it of all that is in it!
To be able to deploy our contract, we are going to use that private key, that's why we recommend, yet again, to use a separate wallet containing only test tokens for developing.
We need to inform Hardhat which node we are using to connect to the blockchain network. Once you have your wallet funded with test ETH, you'll need sign up for an Ethereum RPC Node Providers. We mentioned a few earlier.
After signing up, you'll be asked to create an App. Be sure to select the Sepolia network there. When the app is created, you'll see a 'View Key' button, or similar. Press it and copy the HTTP link, we'll use it as the API-KEY in our next step.
With our wallet funded fake ETH, we can go ahead and change our Hardhat configuration file. Go into your project's main directory and open hardhat.config.js.
We are going to replace our file with this:
require("@nomicfoundation/hardhat-toolbox");

const WALLET_PRIVATE_KEY = "YOUR-PRIVATE-KEY-DONT-SHARE";

const RPC_API_KEY = "YOUR-RPC-URL-FROM-YOUR-RPC-PROVIDER";

/**
 * @type import('hardhat/config').HardhatUserConfig
 */
module.exports = {
  solidity: "0.8.20",
  networks: {
    sepolia: {
      url: RPC_API_KEY,
      accounts: [WALLET_PRIVATE_KEY],
    },
  },
};
And you'll need to set the two global variables using the const keyword with your own values for Hardhat to communicate correctly to the network.
We have already gone through how to get your API KEY.
To get your private key, the most sensitive data of the project, click on the following: Zerion browser icon => settings ⚙️ => Manage Wallets => choose the wallet you need => next, don't click on Recovery Phrase, but choose your wallet from the Wallets option => Private Key. Then enter your password, and copy the private key to clipboard for use. Remember to never disclose this key! Now we can paste it in to our hardhat.config.js
Please, if you are already a developer, and you plan to use Git to store your project, don't store your hardhat.config.js on it, because you will have your private key there.
Ok. We are ready, let's deploy to the Sepolia testnet!
Now we need to run our deploy.js script and the deployment is going to cost us some ETH - test ETH, don't worry - from our wallet, since we are storing information, i.e. our contract on the blockchain. We only have to add 2 words to the command to let Hardhat know we are doing the real thing now. Remember our deploy script will create our contract AND mint one NFT. If you only want to deploy, delete all the lines we added to test the minting.
Run:
npx hardhat run scripts/deploy.js --network sepolia
This is the output i got in my console:

Remember we are deploying to the actual blockchain, a testnet, but a blockchain nonetheless.
Now that we have run the deploy script, delete the private key and the RPC API key from hardhat.config.js to minimize the handling of the wallet. In the next project we will learn about tools to collaborate and store your projects online.
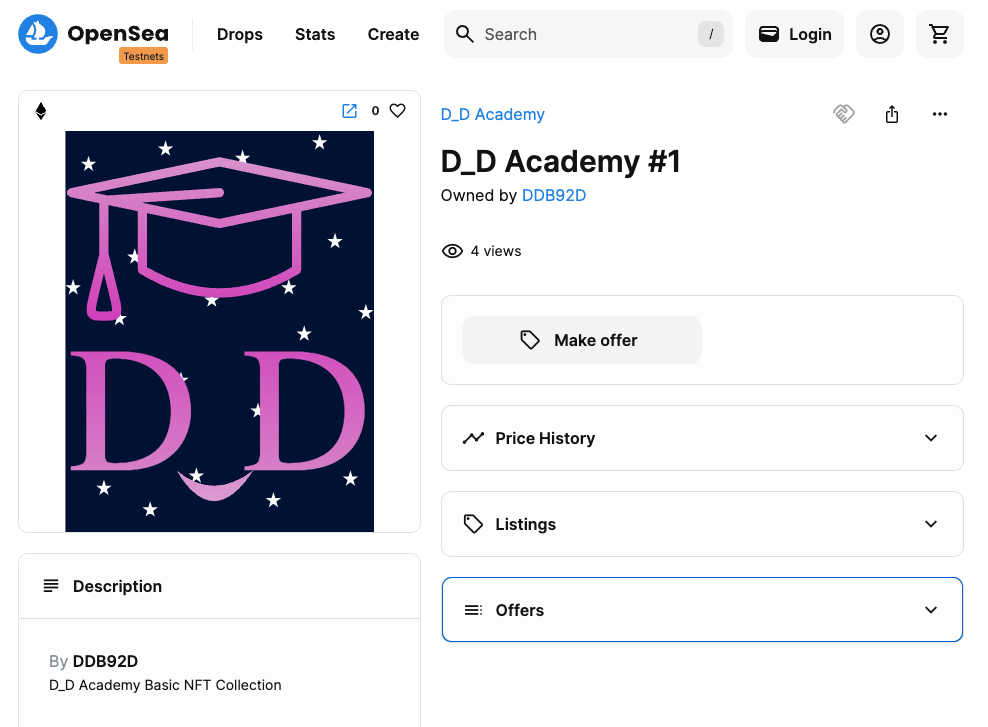
So now we can go and explore the chain to find your contract (and mine too!). Just go to Sepolia Etherscan (or Opensea) and search for the address of our deployed contract.
You can view my links as an example on Etherscan and Opensea
Wow, you have created your own NFT collection from scratch. What a superstar! You have learned tonnes of new concepts and code - that is really impressive. And now you're almost ready to test yourself a little bit more.
But first, we want you to breathe and enjoy. So go and 'touch some grass', and
when you come back after your well earned rest, take the quiz.
Connect your wallet and Sign in to start the quiz
Congratulations on your results. You're now a supreme open-sourcerer! In the next lesson, TierNFTs, you will be building on top of what you did here, adding more functionality to your contracts and to your knowledge of creating ERC721s. In the project after that, you'll be creating automated tests for your smart contracts. And to tie everything together, you'll be building a front end, so a user can easily interact with your creations. Lots of fun in the pipeline! See you in the next one and in our community developerdao.peeranha.io!